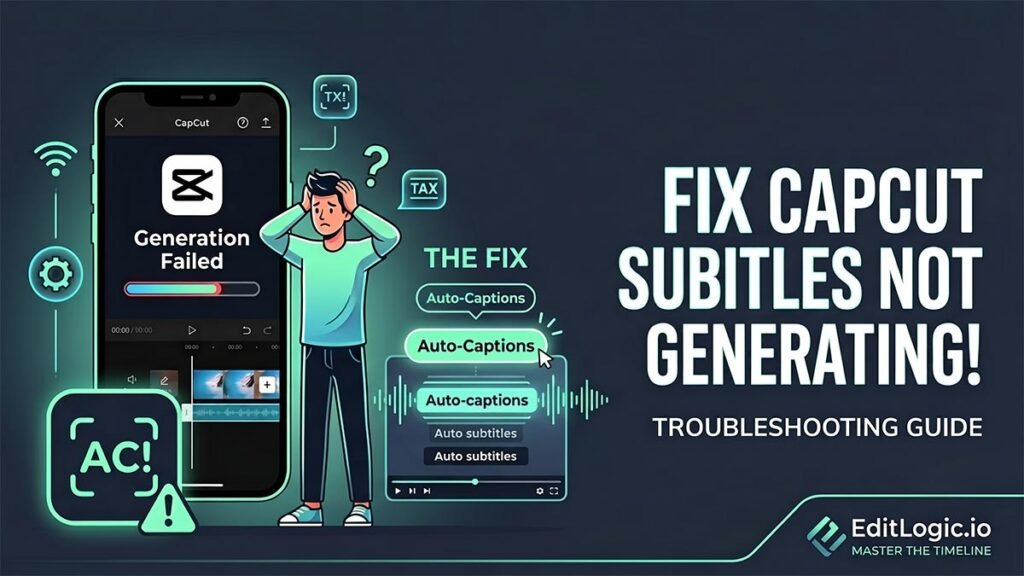
Auto-captions failing in CapCut usually comes down to one of three things: a network issue blocking the speech recognition request, a language pack that didn’t install cleanly, or a cache clog stopping the engine from processing your audio. The progress bar sticking at 99% and an instant “Generation Failed” error are two different symptoms that point to different fixes.
This guide covers how to diagnose which one you’re dealing with and get captions generating again.
Step 1: Force-Flush Clogged App Cache & Temporary Data
Every time you process a new audio file or generate temporary smart elements, CapCut Desktop builds up internal cache folders to speed up timeline playback. However, if these folders become corrupted or bloated, they can block the speech-recognition script from writing new subtitle SRT files to your local project folder.
- Open CapCut Desktop and navigate to the main Homepage/Project Selection window (close out of your current timeline edit).
- Click the Settings icon (gear cog) in the top-right corner and select Settings.
- Under the Project tab, locate the Cache Size field.
- Click the Delete/Trash Can icon next to the cache size reading to wipe out pre-rendered timeline clutter.
- Note: Wiping this cache will not delete your raw video assets or timeline project layouts—it simply flushes out background temp scripts, allowing CapCut to reinitialize its AI processing tools safely.
Step 2: Clear Internet Restrictions & Verify Server Connectivity
CapCut’s speech-to-text algorithm does not run completely locally on your computer; it relies heavily on CapCut’s remote cloud servers to analyze audio tracks and match acoustic patterns to language templates. If your firewall, VPN, or local network connection drops packets for a split second, the generation engine will instantly abort.
- Disable Active VPNs: While a VPN keeps your connection secure, it frequently changes your server node mid-stream, which throws a security flag on CapCut’s backend transcription servers. Turn off your VPN completely while running auto-captions.
- Whitelist CapCut in Your Firewall: Open your operating system’s security settings (Windows Defender or macOS Security & Privacy) and ensure that
CapCut.exehas unrestricted inbound and outbound public/private network rules. - Run a Network Flush (Windows): If your network protocol is hanging, open Command Prompt as an administrator and type
ipconfig /flushdns, then press Enter to reset your machine’s connection pathing.
Step 3: Check Audio Source Integrity & Track Routing
CapCut’s speech engine requires a clean, unobstructed audio track to build text layers. If the source file contains excessive background noise, is compressed at an unsupported variable bit rate (VBR), or is mapped to an inactive channel layout, the automatic transcription engine will fail to register the dialogue.
- Verify Solo/Mute Status: Check your timeline to make sure the track containing the dialogue isn’t accidentally muted or routed to an isolated lane that CapCut skips during final processing.
- Isolate with “Enhance Voice”: If your raw recording has intense background hum or wind noise, click your audio clip on the timeline, navigate to the Audio panel on the top right, go to the Basic sub-tab, and toggle on Enhance Voice. Let the system clean the dialogue track before hitting generate.
- Convert Variable Audio to Constant Audio: If you are editing a video format that utilizes highly erratic audio tracks (like certain phone screen recordings), CapCut’s server can struggle to read the pacing. Try exporting your project as a pure
.MP3or.WAVaudio file, re-importing that audio file back onto the timeline, and generating subtitles using that unified track.
Step 4: Redownload System Language Packs
If CapCut is attempting to translate or transcribe a language (such as English, Spanish, or German) and the specific dialect template file on your hard drive was partially corrupted during a software update, the app will freeze at 99% because it cannot find the execution command.
- Inside your active editing project, go to the top menu and select Text > Auto Captions.
- Look at the Language selection dropdown.
- Switch the language from your default selection to a different random language, wait for CapCut to attempt to initialize it, and then switch it directly back to your target language.
- This forces the CapCut client to ping the official cloud servers, cross-reference your version data, and redownload clean, uncorrupted localized language pack dependencies automatically.
Workflow Tips for Subtitle Success
- The Global Timeline Snapping Trick: Once your auto-captions generate successfully, ensure they stay perfectly locked with your video scenes by checking that timeline snapping is active. Hit the N key on your keyboard to instantly re-engage global timeline snapping so your new text boxes latch perfectly to video frame changes without sliding freely out of sync.
- Elevate with Custom Typography: Default subtitles can look automated and unpolished. Once CapCut builds your text boxes, navigate to the text styling box on the right, use a clean sans-serif like Inter or Poppins, apply a uniform preset style, and ensure the Apply to All checkbox is ticked to change your entire subtitle design layout globally in one click.
You may watch How to Fix Incorrect Auto Captions on CapCut PC for a visual guide on resolving caption inaccuracies and modifying subtitle settings within the interface.
FAQ
Why are my CapCut auto-captions not generating?
There are three main causes: a clogged app cache blocking the subtitle engine from writing new files, a network or firewall issue cutting off CapCut’s connection to its cloud speech recognition servers, or a corrupted language pack that stalls the process at 99%. Identifying which symptom you’re seeing — an instant failure vs. a progress bar that freezes — points you to the right fix.
Why does CapCut subtitle generation get stuck at 99%?
Stalling at 99% almost always means the language pack file on your computer is partially corrupted, usually from an incomplete software update. CapCut completes the audio analysis but then can’t find the execution file it needs to write the subtitles. Fix it by going to Text → Auto Captions, switching the language dropdown to any other language, waiting a moment, then switching back to your target language. This forces CapCut to redownload a clean copy of the language pack from its servers.
Why does CapCut show a “Generation Failed” error immediately?
An instant failure before any processing happens is almost always a network or firewall problem. CapCut’s speech-to-text engine relies on remote cloud servers — if the connection is blocked before the request even sends, generation fails immediately. Disable any active VPN, check that CapCut has unrestricted firewall access on your system, and on Windows try running ipconfig /flushdns in Command Prompt as administrator to reset your network path.
Does CapCut need an internet connection to generate subtitles?
Yes. CapCut’s auto-caption feature sends your audio to remote cloud servers for speech recognition — it does not run the transcription engine locally on your computer. A dropped or blocked connection at any point during the process will cause generation to fail. This is also why VPNs frequently cause subtitle generation errors: they can change server nodes mid-request and trigger a security block on CapCut’s backend.
Can a VPN stop CapCut subtitles from generating?
Yes. VPNs frequently interfere with CapCut’s caption generation because they can switch server nodes during the request, which causes CapCut’s backend servers to reject the connection. Turn off your VPN completely before attempting to generate captions, then re-enable it once the subtitles have been created.
How do I clear the CapCut cache to fix subtitle generation?
Close your active project and return to the CapCut Homepage. Click the Settings gear icon in the top-right corner, select Settings, then go to the Project tab. Click the trash can icon next to Cache Size. This removes temporary render and processing files that can block the subtitle engine — it does not delete your projects or source media.
Can background noise in my recording stop CapCut from generating captions?
Yes. CapCut’s speech recognition engine needs a reasonably clean audio signal to identify dialogue. Heavy background noise, wind, or excessive room reverb can cause the engine to fail or produce no output. Before generating captions, select your audio clip on the timeline, open the Audio panel on the right, go to the Basic sub-tab, and enable Enhance Voice. This applies noise reduction before the caption request is sent.
What should I do if my audio track format is causing caption errors?
Some source files — particularly phone screen recordings — use variable audio bit rates that CapCut’s transcription server struggles to parse. Export your project as a clean MP3 or WAV file, re-import that audio file back onto the timeline as a separate track, and generate captions from that track instead. A consistent, uncompressed audio format gives the speech engine a much cleaner signal to work with.
How do I force CapCut to redownload a corrupted language pack?
Inside your project, go to Text → Auto Captions and open the language dropdown. Switch to any language other than your target, wait a few seconds for CapCut to begin initializing it, then switch back to your original language. This triggers CapCut to contact its servers and redownload a fresh, uncorrupted copy of the language pack files automatically.
How do I apply a custom font to all auto-generated captions at once in CapCut?
Click any caption segment on the subtitle track to open the Text Properties panel. Tick the Apply to all checkbox before making any changes. Any font, size, colour, or style adjustment you make will then update every subtitle block across the entire timeline simultaneously, rather than having to edit each one individually.