CapCut’s default export settings are optimised for file size, not quality. That’s fine for a quick draft, but it’s the reason footage that looked sharp in your timeline comes out soft, pixelated, or flat after upload — and why platform compression makes it worse.
This guide covers the export settings that actually matter: bitrate, codec, colour space, and hardware acceleration. Get these right once and every render after that takes care of itself.
Step 1: Access the Export Menu
Before adjusting any internal sliders, ensure you are looking at the correct configuration layout.
- Navigate to the top-right corner of the CapCut Desktop interface.
- Click the blue Export button.
- A large configuration pop-up box will appear. Ensure the Video exporting checkbox is enabled.
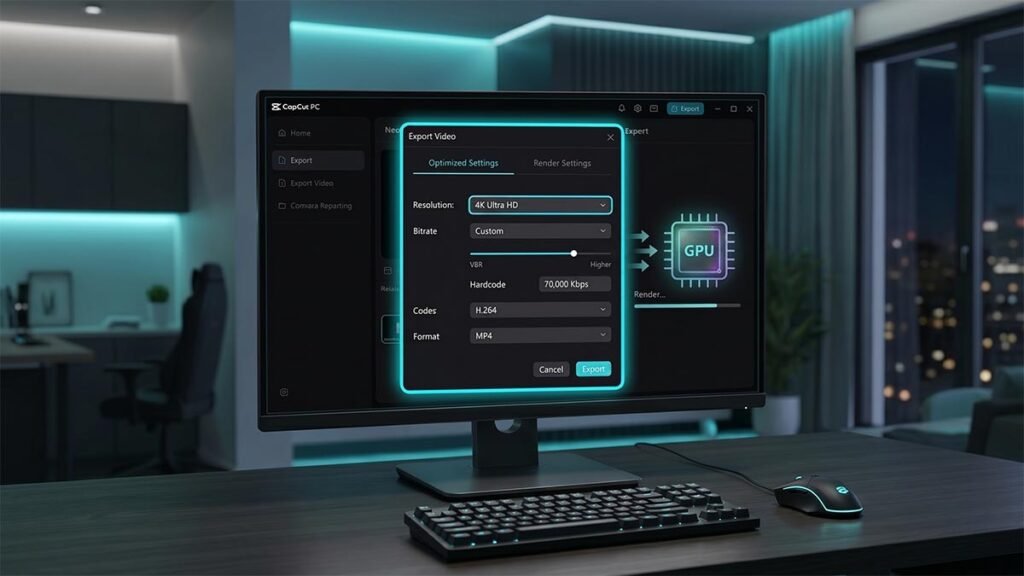
Step 2: Configure the Master Video Settings
To achieve a premium, high-definition result that retains high visual data without bottlenecking your system, apply these exact settings in the dropdown menus:
- Resolution: Select 2K/4K if your original source footage was shot in 4K. If you shot your clips in standard HD, choose 1080p. Never upscale 1080p footage to 4K during export, as this introduces pixel artifacting.
- Bitrate: Change this from “Recommended” to Custom, and switch the dropdown menu from CBR to VBR (Variable Bit Rate). Set the slider to Higher. If you prefer a numeric hardcode, aim for 30,000 to 45,000 Kbps for 1080p, and 70,000 to 100,000 Kbps for 4K. This forces CapCut to allocate more data density to high-motion scenes.
- Codec: Choose H.264. While HEVC (H.265) offers slightly smaller file sizes, H.264 provides universal compatibility across web browsers, older media players, and social media compression systems. For a deep technical breakdown of how this industry-standard algorithm uses inter-frame prediction to compress data without sacrificing master clarity, you can explore the comprehensive H.264 Video Compression Overview by Apple Developer Documentation.
- Format: Select MP4. It is widely recognized as the industry-standard container for web distribution.
- Frame Rate: Select 30fps or 60fps, matching the exact frame rate of your project timeline and source footage. To ensure your properties align flawlessly with standard platform requirements before hitting social media compression algorithms, you can cross-reference your timeline parameters directly with official platform benchmarks.
Step 3: Turn On Hardware GPU Acceleration
Exporting high-bitrate video can intensely strain your computer hardware. To prevent CapCut from freezing at 99% or crashing entirely during the rendering process, let your computer’s graphics card handle the heavy lifting.
- Close the Export window temporarily.
- In the top-left main menu, navigate to Menu > Settings > Performance.
- Check the box for Speed up hardware decoding.
- Check the box for Speed up hardware encoding.
- Click Save, and return to your export project layout.
Export Settings Summary Table
| Export Element | Optimal Selection | Performance & Quality Impact |
| Resolution | 1080p (Standard) / 2K/4K (Premium) | Maximum canvas crispness; prevents blurry uploads. |
| Bitrate | Custom $\rightarrow$ VBR (Higher) | Eliminates pixelation during high-motion action scenes. |
| Codec | H.264 | Provides maximum compatibility across social platforms. |
| Format | MP4 | Universal video container format. |
| Frame Rate | 30fps or 60fps (Match Source) | Ensures smooth playback without micro-stutters. |
Pro-Tips for Social Media Success
Social Media Trick: Large video files are hugely compressed by social media platforms, such as TikTok and Instagram, when they are uploaded. Using H.264 and exporting with a higher VBR Bitrate puts the best data blueprint of the platform. That way, your timeline assets remain super crisp even after you’ve compressed your video with your compression algorithm. You are not relying on CapCut’s automatic settings and can control the technical elements in order to ensure you always get a crystal clear, professional layout every time you click render. Your uploaded material will now accurately mirror the painstaking editing you’ve performed.