Font choice does more work than most editors give it credit for. The right typeface carries tone, reinforces branding, and makes text feel intentional rather than default. The wrong one — or just whichever font CapCut opened with — makes even well-graded footage feel generic.
CapCut Desktop lets you import your own .TTF and .OTF font files directly, bypassing the built-in library entirely. This guide walks through how to download, install, and use custom fonts in CapCut on both Windows and Mac.
Yoast SEO Metadata & Categorization
- Yoast Focus Keyphrase: import custom fonts in capcut desktop
- WordPress Category: CapCut Basics & Workflow
- WordPress Tags: capcut custom fonts, add fonts to capcut, capcut typography, install fonts capcut pc
Why Use Custom Fonts in CapCut Desktop?
Before diving into the step-by-step installation, it’s vital to understand why custom typography matters for your editing workflow:
- Brand Consistency: If your business or personal brand utilizes specific fonts (like Montserrat, Inter, or Poppins) across your website and social channels, using those exact fonts in your video assets maintains your visual continuity.
- Higher Audience Retention: Clean, highly readable, customized text overlays keep viewers locked in longer compared to low-quality, generic system presets.
- Algorithmic Edge: High-retention editing styles—specifically seen in popular shorts and reels—rely heavily on bold, custom font styles to emphasize hooks and key phrases.
Prerequisites: What You Need Before Starting
To successfully add custom typography to your timeline, make sure you have the following ready:
- CapCut Desktop Installed: Ensure your software is updated to the latest stable version on your PC or Mac.
- Font Files Downloaded: Grab your preferred font files from trusted libraries like Google Fonts or DaFont. CapCut supports standard .TTF and .OTF formats.
- An Active Project Open: Have a timeline ready inside CapCut where you can test and save your text styles.
Before you can utilize unique lettering styles inside your project timeline, you first need to download your preferred .TTF or .OTF files from a secure, open-source repository like the official Google Fonts directory.
Step 1: Install the Font on Your Operating System
Unlike some traditional video editing suites where you have to manually upload assets into an internal media locker, CapCut Desktop is built to automatically mirror your system’s native font library. This means to use a font in CapCut, you simply need to install it on your computer’s operating system first.
For Windows Users:
- Download your chosen font folder (usually downloaded as a compressed
.zipfile). - Right-click the
.zipfile and select Extract All to reveal the actual.ttfor.otffiles. - Open the extracted folder, right-click the specific font file, and select Install (or Install for all users if you run an administrator account).
- Windows will add the font to your system directory (
C:\Windows\Fonts) within a couple of seconds.
For Mac Users:
- Download and extract the font archive file on your desktop.
- Double-click the
.ttfor.otffile to open the native macOS Font Book application preview. - Click the blue Install button in the pop-up box.
- The font is now securely registered inside your Mac’s system library.
Step 2: Relaunch CapCut Desktop to Sync System Assets
If CapCut Desktop was open while you were installing your new font files, the software will not register the changes immediately. This is because CapCut reads your system’s font directory only during its initial boot sequence.
- Save your active project timeline.
- Completely close the CapCut Desktop application. (On Windows, check your task tray to ensure it isn’t running in the background; on Mac, use
Cmd + Qto fully quit the app). - Relaunch CapCut Desktop and reopen your video project.
Step 3: Locate and Apply Your Custom Fonts
Now that your operating system has registered the files and CapCut has executed a clean startup sync, you can find your custom typography waiting for you inside the text properties panel.
- Navigate to the top-left menu panel and click on the Text tab.
- Click the Default Text block (or any text preset) and drag it directly onto your timeline over your video clips.
- Select the text block on your timeline. This action opens the Text Properties Box in the top-right corner of the interface.
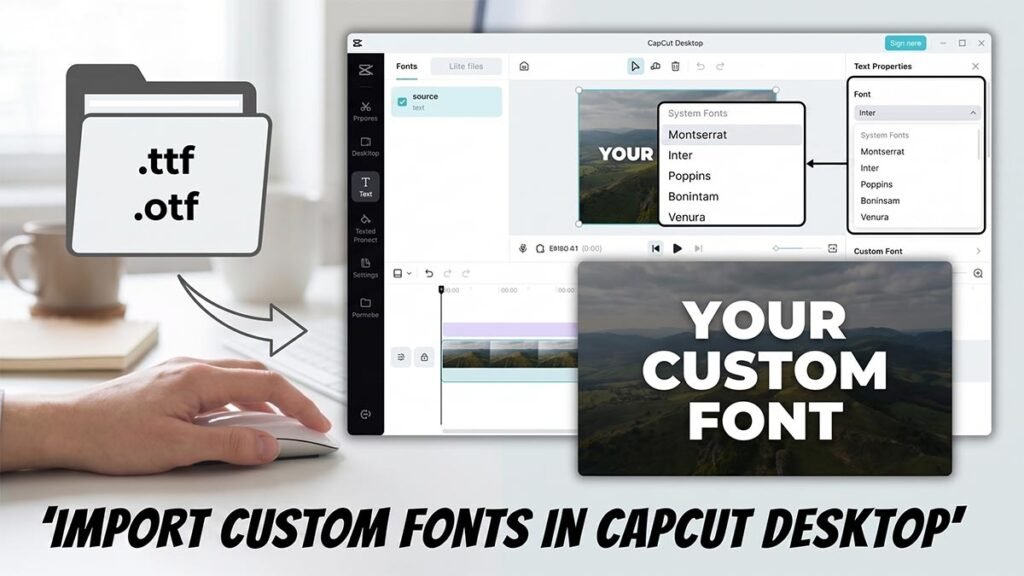
- Under the Basic tab, look for the Font dropdown menu (it defaults to “System” or a preset name).
- Click the dropdown and scroll past CapCut’s cloud font library until you see the System Fonts section. Your newly installed fonts will appear here in alphabetical order.
- Click your custom font to instantly apply it to your timeline text box.
Worth knowing
Importing beautiful custom .TTF or .OTF files is the fastest way to replace default, unpolished templates. However, before you can begin applying signature typography styles to your timeline, you first need to make sure your text assets are successfully generated. If you encounter errors during the processing phase, check out our diagnostic blueprint to troubleshoot stuck or failed automatic captions inside your project in just a few clicks.
Once your automatic captions are generated successfully, you can overhaul their look globally to match your aesthetic:
- Click on any auto-generated caption segment in your subtitle track.
- In the top-right text settings window, make sure the Apply to all checkbox is ticked.
- Change the font selection to your new custom system font under the System Fonts dropdown menu.
- Adjust the font size, tracking, and add a clean stroke or shadow styling. Because “Apply to all” is active, CapCut will perfectly update every single subtitle box across your entire timeline simultaneously, saving you hours of repetitive manual alignment.
FAQ
Does CapCut Desktop support custom fonts?
Yes. CapCut Desktop automatically mirrors your operating system’s font library, so any .TTF or .OTF font installed on your Windows PC or Mac becomes available inside CapCut’s text properties panel under the System Fonts section. There is no manual upload process — installing the font on your computer is enough.
What font formats does CapCut Desktop support?
CapCut Desktop supports .TTF (TrueType Font) and .OTF (OpenType Font) files. These are the two standard formats used by the vast majority of font libraries including Google Fonts and DaFont, so compatibility is rarely an issue.
Where can I download free fonts to use in CapCut?
Google Fonts is the most reliable source — all fonts are free, open source, and available in .TTF or .OTF format. DaFont is another widely used option with a larger decorative and display font library. Both sites let you download font files directly without an account.
How do I install a custom font on Windows for use in CapCut?
Right-click the downloaded .zip file and select Extract All. Open the extracted folder, right-click the .TTF or .OTF file, and select Install (or Install for all users if you have administrator access). Windows adds the font to the system font directory automatically. Fully close and relaunch CapCut Desktop afterward so it picks up the new font on startup.
How do I install a custom font on Mac for use in CapCut?
Extract the downloaded font archive, then double-click the .TTF or .OTF file. macOS Font Book opens a preview automatically. Click the Install button in the pop-up window. The font is registered in your Mac’s system library immediately. Quit CapCut completely using Cmd+Q and relaunch it before trying to find the font in the text panel.
Why isn’t my custom font showing up in CapCut after installing it?
CapCut reads your system’s font directory only when it first launches. If CapCut was already open when you installed the font, it won’t detect the new file until you fully close and restart the app. On Windows, check the system tray to make sure CapCut isn’t still running in the background before relaunching. On Mac, use Cmd+Q to quit completely rather than just closing the window
Where do I find installed system fonts inside CapCut Desktop?
Add a text layer to your timeline and select it to open the Text Properties panel on the right. Under the Basic tab, click the Font dropdown. Scroll past CapCut’s built-in cloud font library until you reach the System Fonts section. Your installed fonts appear there in alphabetical order.
Can I apply a custom font to all auto-captions at once in CapCut?
Yes. Click any caption segment on the subtitle track, then tick the Apply to all checkbox in the Text Properties panel before changing the font. Any style change you make — font, size, colour, stroke, shadow — will apply to every subtitle block across the entire timeline at the same time.
Will custom fonts I use in CapCut be embedded in the exported video?
Yes. When CapCut renders the final export, text layers are baked into the video frames as pixels. The font does not need to be present on the viewer’s device — it is rendered permanently into the video during export, so playback looks the same everywhere.
Can I use the same custom font on both Windows and Mac in CapCut?
Yes, as long as you install the same font file on each machine. CapCut reads system fonts on whatever computer it’s running on, so a project that uses a custom font will display correctly on any device where that font is installed. If you open the project on a machine without the font installed, CapCut will fall back to a substitute font for that text layer.