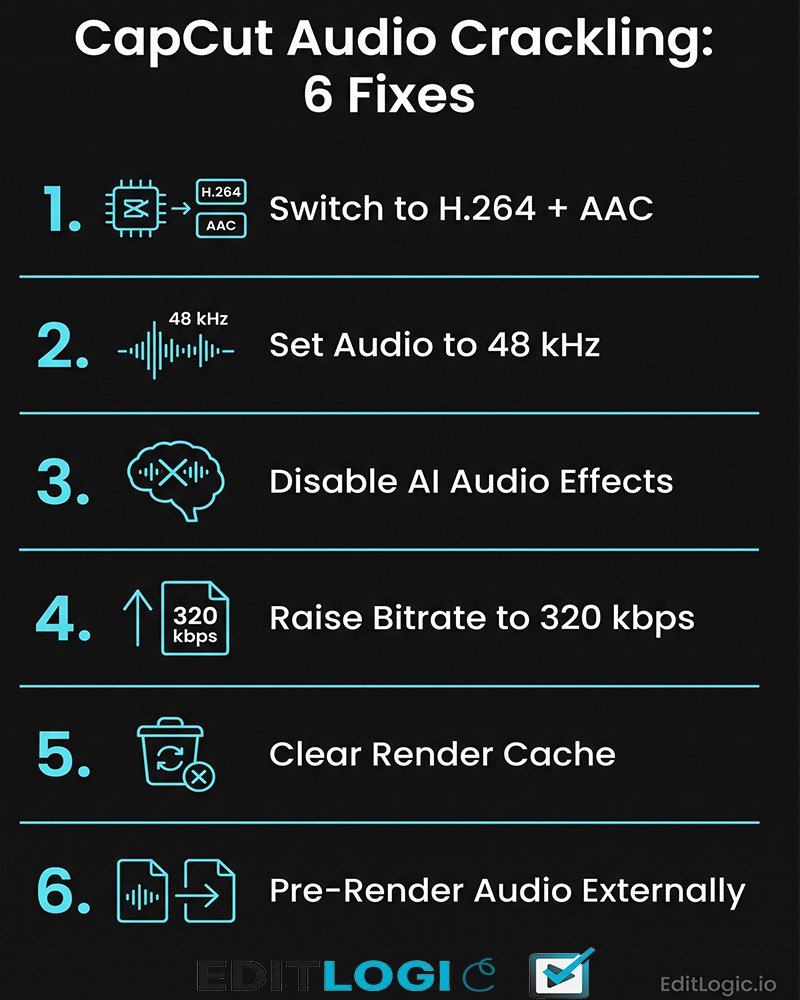
CapCut audio crackling on export is almost always caused by one of three things: a sample rate mismatch between your audio assets, a codec conflict introduced by HEVC encoding, or AI audio effects overloading the render pipeline. The fix depends on which one you have — and they produce slightly different symptoms.
Why It Happens
CapCut’s audio engine processes each asset individually during playback. When you mix audio files recorded or exported at different sample rates — 44.1 kHz from a music file and 48 kHz from a camera — the engine compensates in real time without issue. The problem surfaces at export, when CapCut has to commit those assets to a single unified audio stream. If the sample rates don’t match, the conversion introduces artifacts: clicks, pops, and a crackling distortion that gets worse over longer timelines.
HEVC (H.265) export compounds this. CapCut’s HEVC encoder handles video compression well but its audio muxing — the process of combining audio and video into the final container — is less stable than H.264. Editors switching to HEVC for file size often find the CapCut audio distortion on export appears specifically on that codec and disappears when they switch back.
AI audio effects add a third variable. Noise reduction, voice enhancement, and auto-caption processing all run as separate audio layers. When these stack on the same track alongside music or voiceover, the render pipeline has to process multiple audio passes simultaneously — and on mid-range PCs, that’s where the CapCut audio glitch after rendering shows up.
How to Fix It
Work through these steps in order. Each one addresses a specific cause. If the crackling stops after a step, you’ve found your problem and don’t need to continue.
Step 1 — Switch your export codec to H.264 with AAC audio
In the Export panel, change the codec from HEVC (H.265) to H.264. Set the audio codec to AAC if the option is available. H.264 with AAC is the most stable audio export combination in CapCut Desktop and eliminates codec-level distortion. For YouTube specifically, H.264 at your target bitrate handles platform re-compression better than HEVC anyway — so this change improves both audio stability and overall export quality.
Step 2 — Standardise your audio sample rate to 48 kHz
Before importing audio into CapCut, confirm all your assets are at 48 kHz. This is the standard for video production. Music files downloaded from the web are often at 44.1 kHz — the standard for music playback — which creates the mismatch.
To convert: use a free tool like Audacity or an online converter. Import the audio file, go to the bottom toolbar and change the project sample rate to 48000 Hz, then export as WAV. Replace the original file in your CapCut timeline with the converted version. If you’re working with music for beat-synced edits, CapCut’s Beat Sync tool can handle the alignment after you’ve replaced the file.
Step 3 — Disable AI audio effects and re-export
Select each audio track on your timeline and check the right-side panel for any active effects: noise reduction, voice enhancement, AI denoise, or auto-normalisation. Turn them all off. Export a short test clip — two to three minutes of the section that was crackling — and check the output.
If the crackling is gone, the AI effects were overloading the render pipeline. Re-enable them one at a time, exporting a test clip after each one, until you identify which effect causes the problem. In most cases noise reduction and voice enhancement running on the same track simultaneously is the culprit.
Step 4 — Raise your audio bitrate
In the Export panel, find the audio bitrate setting. If it’s set below 192 kbps, increase it to 320 kbps. Low audio bitrate forces heavy compression on the audio stream during export, which introduces distortion on tracks with complex frequency content — layered music, voice-over with room tone, or any audio that was already compressed before import.
320 kbps AAC is the ceiling for what YouTube will process before its own compression pass, so there’s no benefit going higher. Set it at 320 kbps and leave it there for all YouTube exports.
Step 5 — Clear the render cache and restart
Go to Menu → Settings → Project tab. Click the trash icon next to Cache Size and confirm. Close CapCut completely, relaunch, and attempt the export again. Corrupted cache files can cause render-level audio artifacts that have nothing to do with your project settings — clearing them removes the variable.
Step 6 — Pre-render your audio track externally
If none of the above resolves it, export just your audio timeline from CapCut by muting all video layers and exporting as an MP4. Take the audio from that file, import it back into a new CapCut project alongside your video, and re-export. This bypasses CapCut’s live audio render pipeline entirely and forces it to process pre-rendered audio instead of calculating everything simultaneously. It’s an extra step but eliminates virtually all render-side audio bugs.
FAQ
Why does my CapCut audio sound fine in the preview but crackle after export?
Preview playback uses real-time audio processing, which compensates for sample rate mismatches and codec conflicts on the fly. Export commits everything to a fixed audio stream, which is where those compensations break down. The preview sounding clean doesn’t rule out an export-level issue.
Does CapCut audio crackling happen more on long videos?
Yes. Sample rate conversion artifacts and AI audio processing overloads compound over time. A two-minute video may export cleanly while a fifteen-minute video on the same settings produces consistent crackling from the halfway point onward. Standardising your sample rates before import prevents this from scaling with video length.
Will exporting in 4K make the audio crackling worse?
Not directly — 4K affects video render load, not audio processing. However, on mid-range PCs a 4K export taxes the CPU and GPU heavily, leaving fewer resources for audio processing. Lowering export resolution to 1080p during testing isolates whether the crackling is system-load related or a project-level issue.
Is CapCut audio distortion on export a known bug?
HEVC audio muxing instability is a documented issue on the CapCut Desktop forums and has been present across multiple versions. The H.264 switch in Step 1 is the consistent workaround. Sample rate mismatches and AI effect conflicts are not bugs — they’re predictable results of how CapCut’s render pipeline handles mixed assets.