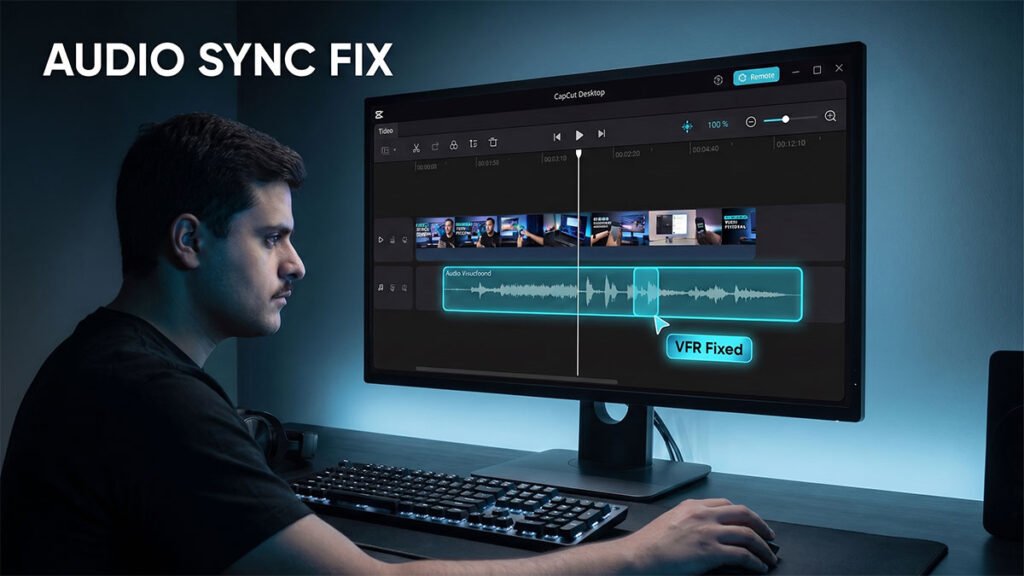
Audio sync drift is one of the more demoralizing export surprises — your timeline preview looks locked, but the final file has the voice sliding half a second behind the picture. The longer the video, the worse it gets.
In most cases the footage itself isn’t the problem. CapCut is misreading the frame rate — usually because the source clip was recorded on a smartphone and uses a Variable Frame Rate (VFR), where the camera quietly drops or adds frames to manage storage and lighting. CapCut expects a steady, constant frame rate, and when it doesn’t get one, the audio and video gradually pull apart.
This guide covers how to diagnose which type of drift you’re dealing with and fix it — whether it’s happening in the preview or only showing up after export.
Why is CapCut Audio Drifting Out of Sync?
Before jumping into the fixes, it helps to understand why this problem occurs. Audio desync typically breaks down into two distinct scenarios:
- Timeline Preview Delay: The audio is out of sync only while editing inside CapCut Desktop, but it looks fine when exported. This is caused by your computer choking under a heavy processing load, causing dropped visual frames while the audio engine plays ahead in real-time.
- Render Delay (Export Drift): The preview looks great, but the exported MP4/MOV file gets progressively worse as the video goes on. This is caused by Variable Frame Rate (VFR) footage (common in iPhone, Android, and OBS screen recordings). While media players expect a Constant Frame Rate (CFR) like exactly 30 or 60 frames per second, smartphones constantly drop or increase frame counts to preserve storage or compensate for lighting changes. CapCut can misinterpret this floating layout, causing the audio track to slide away from the visual track over time.
Step 1: Force Constant Frame Rate (CFR) Transcoding
If your audio drifts progressively worse from the beginning to the end of your exported video, your source video uses a Variable Frame Rate. CapCut tries its best to parse VFR files, but heavy multi-layer editing breaks the sync map. To fix this, you need to normalize your raw assets into a strict Constant Frame Rate file before bringing them into the timeline.
While professional transcoding tools like HandBrake work beautifully, you can handle this directly within your operating system or free utility software:
- Download and open HandBrake (a free, open-source transcoder trusted across the software industry).
- Drop your problematic smartphone or OBS recording into the interface.
- Navigate to the Video tab.
- Under Framerate (FPS), select your target standard layout (e.g.,
30or60). - Crucially, click the radio button for Constant Framerate.
- Set your encoder profile to H.264 or H.265, click Start Encode, and import this newly rendered master clip into your CapCut project to replace the drifting track.
Step 2: Activate Performance Proxies and Drop Preview Resolution
If your audio sync issue is occurring strictly inside your live editing window, your system lacks the bandwidth to process heavy high-bitrate codecs alongside your audio effects layers. Dropping preview resolutions frees up vital background system threads.
- Look directly above the top right corner of your active project timeline timeline panel.
- Click the Ratio / Preview Quality dropdown box (it may say Adaptive or show a percentage).
- Switch your project display setting from Original or High Definition down to Performance Mode (or lower the resolution slider). This shifts the visual layout into a highly compressed preview window without changing your final render parameters.
- Next, navigate to the top left main menu bar and select Menu -> Settings.
- Open the Performance tab.
- Enable the checkbox for Proxy. Set your proxy configuration parameter to
720por lower. This forces CapCut Desktop to automatically build lightweight editing duplicates behind the scenes, allowing your timeline preview cursor to lock cleanly to the audio track wave frames without dropping performance elements.
Step 3: Match Timeline Frameworks and Enable Hardware Acceleration
When your project timeline settings don’t align precisely with your original camera profiles, CapCut continuously tries to scale and realign your frames mid-playback. This creates micro-stutters that quickly throw the audio out of alignment.
Verify Your Project Frame Rate
- Click on any empty space inside your timeline tracks to ensure no specific asset is selected.
- Look at the right-hand panel properties box. You will see a readout detailing your active project configuration data.
- Check the Frame Rate field. If your footage was shot at 30fps but your project layout is running at 24fps or 60fps, modify the dropdown selection to match the exact properties of your raw assets.
Engage GPU Compute Cycles
If your processor is forced to carry both video decoding and audio multiplexing tasks simultaneously, execution speeds will collapse.
- Navigate back to Menu -> Settings -> Performance.
- Ensure that Hardware acceleration for video decoding and Hardware acceleration for video encoding are both fully active.
- Click Save, close CapCut, and restart your computer to flush your hardware cache layers.
Step 4: Clear Clogged Cache Layers and Clear Audio Device Hangs
Over time, CapCut builds up an enormous structural index of audio waves and pre-render asset fragments. If this cache directory becomes heavily fragmented, the software interface thread will begin to hang, dragging your playback components out of alignment.
- Open the main CapCut startup screen (the project selection grid before entering an active edit).
- Click the Settings gear icon in the top-right corner and select Settings.
- Under the Project tab, look directly across from Cache Size.
- Click the small trash can icon or choose Delete to safely clear out temporary background rendering files. This won’t touch your raw media files or your saved timeline cut properties; it simply wipes out clogged temporary system files.
If you manage to clear your render blocks but find that your workspace remains sluggish or locks up after editing sessions, you can review our companion guide on [how to safely clear your CapCut cache data without deleting your timelines].
Workflow Tips
- The Global Timeline Snapping Trick: When adjusting your audio tracks manually to line up with mouth movements, ensure your assets don’t slip freely past your precise cut coordinates. Hit the N key on your keyboard to instantly activate global timeline snapping, forcing your video splits and audio boundaries to align perfectly down to the single frame layout.
- Split the Track and Align Audio Waves: If you have an audio delay that is uniform throughout the entire video (meaning it’s exactly 5 frames late from start to finish), don’t try to stretch the clip. Instead, right-click your video asset in the timeline track layout and select Separate Audio. This detaches the sound wave completely into its own clean layer. Zoom far into the timeline tracks, locate a prominent consonant spike or clap sound wave pattern, and slide the independent sound strip until it locks perfectly to the visual cue.
- Coordinate with Platform Guidelines: To safeguard your finalized project dimensions from aggressive online quality re-compression routines that can introduce playback anomalies or sound desynchronization on mobile browsers, cross-reference your timeline properties directly with the industry-standard delivery guidelines outlined in the official Google YouTube Video Encoding Specifications before hitting render.
Restore A/V Sync Tutorial explains how to adjust frame settings and resolve processing delays to eliminate audio lag issues entirely. When smartphones or screen recorders drop frames during heavy CPU spikes, they output files with Variable Frame Rates (VFR). If CapCut fails to map these fluctuating timestamps smoothly over your linear workspace, you can batch-transcode the culprit clips into a rock-solid Constant Frame Rate (CFR) by leveraging the configuration parameters detailed in the official HandBrake Documentation on Frame Rate Controls before re-importing your media.
FAQ
Why is my CapCut audio out of sync after exporting?
The most common cause is Variable Frame Rate (VFR) footage. Smartphones and screen recorders like OBS record at a floating frame rate that adjusts based on motion and lighting. CapCut expects a consistent Constant Frame Rate — when it can’t map VFR timestamps cleanly, the audio drifts progressively further from the video as the export runs. Convert your source clips to CFR using HandBrake before importing them into CapCut.
Why does the audio sound fine on the timeline but drift in the exported file?
This is the clearest sign of a VFR source file. CapCut’s internal preview engine can compensate for fluctuating timestamps in real time, but the export pipeline processes every frame sequentially and can’t smooth them over. The mismatch accumulates and becomes audible in the finished file. Transcoding to CFR in HandBrake before importing resolves it.
Why is audio out of sync while editing, but the export looks fine?
This is a hardware performance issue, not a file problem. Your computer is dropping video frames during playback because the CPU or GPU can’t decode the footage fast enough, while the audio engine keeps playing ahead. Enable proxy mode in Menu → Settings → Performance and lower the preview resolution — this reduces the processing load so the timeline keeps audio and video locked during editing without affecting export quality.
How do I convert VFR footage to CFR for CapCut?
Download HandBrake (free and open source). Open your source clip, go to the Video tab, set Framerate to 30 or 60, and select Constant Framerate. Set the encoder to H.264 or H.265, click Start Encode, then import the new file into CapCut to replace the original clip.
Does iPhone footage cause audio sync problems in CapCut?
Yes, frequently. iPhone video uses a Variable Frame Rate by default — the camera drops or adds frames to manage storage and handle lighting changes. On longer recordings or projects with many iPhone clips, the accumulated frame drift causes progressive audio desync in the export. Transcoding to CFR in HandBrake before importing fixes it.
What is proxy mode in CapCut and does it affect export quality?
Proxy mode creates lightweight lower-resolution duplicates of your footage that CapCut uses during editing to reduce processing load. When you export, CapCut automatically switches back to your original full-quality source files. Export quality is completely unaffected — proxies only exist to keep the timeline preview smooth.
How do I fix audio that is uniformly late throughout the whole video?
If the audio is consistently offset by the same amount from start to finish (rather than drifting progressively), right-click the video clip on the timeline and select Separate Audio. This detaches the sound into its own independent track. Zoom into the timeline, find a sharp transient like a clap or hard consonant, and slide the audio strip until the waveform spike lines up with the matching visual moment. Press N to enable timeline snapping so it locks cleanly to frame boundaries.
Does clearing the CapCut cache fix audio sync issues?
It can, particularly when desync starts appearing after extended editing sessions. CapCut accumulates pre-render fragments and audio wave index files over time, and a heavily fragmented cache can cause playback threads to hang and create apparent desync. Clear it via Settings → Project tab → trash icon next to Cache Size. This removes temporary render files only — your projects and source media are not affected.
Should my CapCut project frame rate match my footage?
Yes. If your footage is 30fps but your project is set to 24fps or 60fps, CapCut converts frames continuously during playback, creating micro-stutters that can push audio out of step with video. Click an empty area of the timeline, check the Frame Rate shown in the right properties panel, and update it to match your source footage exactly.
Does enabling hardware acceleration help with audio sync in CapCut?
Yes, when the sync issue is performance-related rather than a VFR file problem. Without hardware acceleration, CapCut forces your CPU to handle both video decoding and audio processing simultaneously, which can cause frame drops that create the appearance of desync. Enable both hardware acceleration options in Menu → Settings → Performance, save, and restart CapCut.