CapCut Desktop crashes when you add too many clips because it loads every asset on the timeline into active memory simultaneously. Unlike professional NLEs that stream media on demand, CapCut pre-buffers clips for preview — and once your RAM usage hits the ceiling, the process terminates. The crash isn’t random; it’s a predictable result of how CapCut manages (or fails to manage) memory under load.
Why This Happens
CapCut Desktop was built primarily as a mobile app scaled up to desktop. Its memory architecture reflects that origin. On mobile, projects are short, clips are few, and RAM constraints are handled by the OS aggressively. On desktop, editors stack 40, 60, 100+ clips on a timeline with multiple audio tracks, overlays, and effects — and CapCut tries to hold all of it in memory at once. When available RAM runs out, Windows or macOS kills the process. You see a crash, not an out-of-memory warning, because CapCut doesn’t have a graceful fallback. The result is CapCut not responding, a frozen preview window, or an instant close with no error message.
The fix isn’t a single setting. It’s a combination of reducing what CapCut loads into memory, offloading rendering work to the GPU, and restructuring how your project is built.

Step-by-Step Fixes
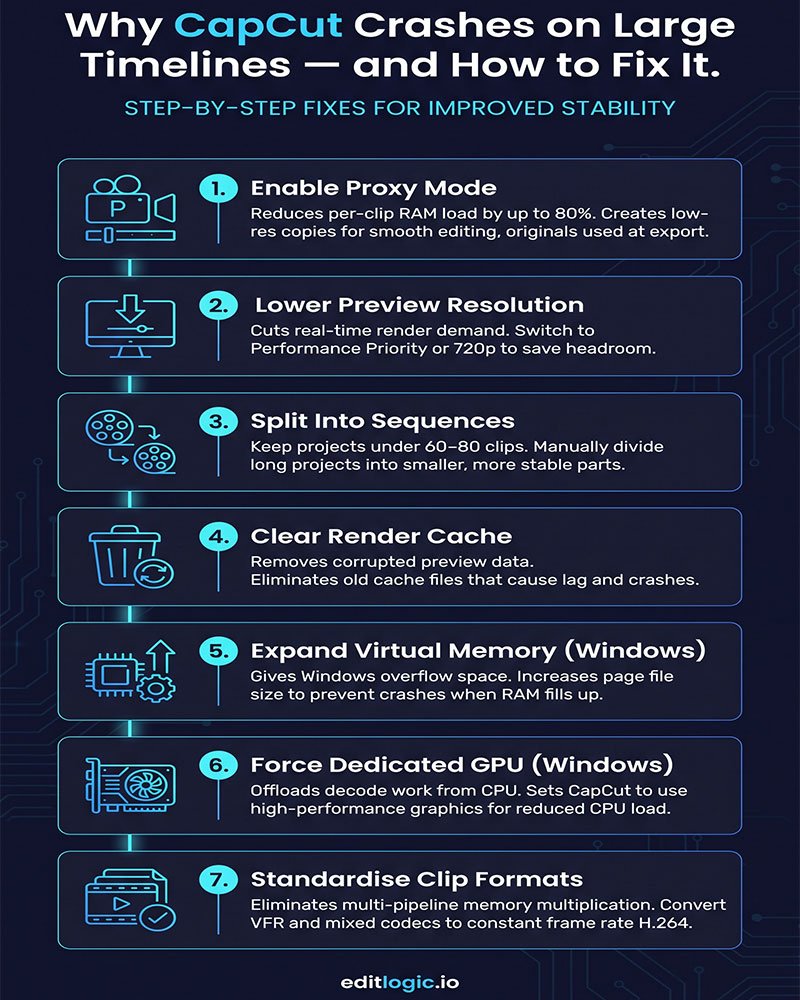
1. Enable Proxy Mode Before You Build Your Timeline
Go to Menu → Settings → Performance → Proxy and turn it on. Set proxy resolution to 720p.
Proxy mode creates low-resolution copies of your source files and uses those for playback and editing. Your original files stay untouched and get used at export. This single change reduces CapCut’s RAM usage per clip by 60–80% depending on your source footage resolution. If you’re editing 4K footage and crashing at 30 clips, enabling proxy often pushes that ceiling past 100.
The catch: enable this before you add clips, not after. Enabling proxy mid-project forces CapCut to regenerate proxies for existing clips, which can itself cause instability on large timelines.
2. Lower the Preview Resolution
Click the three-line menu above the preview window and switch from Best Quality to Performance Priority or a fixed lower resolution like 720p.
This reduces how much data CapCut renders per frame during playback. It doesn’t affect your export — it only changes what you see while editing. On a 1080p or 4K timeline with 50+ clips, real-time preview is the primary driver of CapCut RAM usage. Dropping preview resolution keeps more headroom available for the timeline engine itself.
3. Split Long Projects Into Sequences
If your timeline has more than 60–80 clips in a single project, split it. Edit Act 1 in one project file, Act 2 in another, export each, then combine the exports in a final assembly project.
This is how professional editors have always handled long-form content — not because their software can’t handle it, but because smaller projects are faster, more stable, and easier to manage. CapCut has no sequence or nest feature like Premiere Pro, so manual splitting is your only option. A project with 30 clips is dramatically more stable than one with 90.
4. Clear the Render Cache
Go to Menu → Settings → Cache Management and delete the cache.
Over time, CapCut accumulates render cache from previews, proxy files, and export attempts. Corrupted or oversized cache files can cause CapCut timeline lag and, in some cases, crashes when the cache directory is being read during a heavy load. Clearing the render cache forces CapCut to rebuild its preview data from scratch — if you want to understand what else contributes to slowdowns beyond crashing, our CapCut Desktop lag fix guide covers the full performance picture.
If you’re seeing crashes specifically when adding clips rather than during playback, a corrupted cache is a likely contributor.
5. Check and Increase Windows Virtual Memory
On Windows: Control Panel → System → Advanced System Settings → Performance → Advanced → Virtual Memory → Change.
Uncheck “Automatically manage paging file size,” select your drive, set a custom size. A reasonable starting point: minimum 8192 MB, maximum 16384 MB.
Virtual memory (the page file) is disk space Windows uses as overflow when physical RAM fills up. If your page file is too small or managed poorly, Windows has nowhere to put the overflow and terminates the CapCut process instead. This is especially relevant if you’re running 16GB RAM or less and editing high-resolution footage. Expanding virtual memory doesn’t make CapCut faster — it gives it a safety net so that hitting the RAM ceiling causes slowdown rather than a crash.
On macOS, virtual memory is managed automatically and can’t be configured manually. Mac users hitting this issue should focus on proxy mode and project splitting.
6. Force CapCut to Use Your Dedicated GPU
On Windows: Settings → System → Display → Graphics. Find CapCut in the list (or browse to the .exe), select it, click Options, and set to High Performance.
This tells Windows to run CapCut on your discrete GPU rather than the integrated graphics. CapCut offloads video decoding and some preview rendering to the GPU — if it’s running on integrated graphics, that work falls back to the CPU, increasing RAM pressure and slowing the timeline engine. Switching to the dedicated GPU reduces the CPU and RAM load that directly contributes to crashes on clip-heavy timelines.
7. Audit Your Clip Format Consistency
Open your source files and check their specs. If your timeline mixes Variable Frame Rate (VFR) footage from a phone, fixed 60fps footage from a camera, and screen recordings at 30fps, CapCut has to run a separate decode pipeline for each format type.
Mixed codecs and frame rates don’t just cause CapCut timeline lag — they multiply memory usage because CapCut can’t batch-process mismatched clips. Before importing, convert VFR footage to constant frame rate using Handbrake (use the same FPS as your project) and standardise to H.264 where possible. H.265/HEVC is harder to decode in real time and increases RAM demand per clip significantly.
FAQ
How many clips can CapCut Desktop handle before crashing?
There’s no fixed number — it depends on your RAM, source footage resolution, and how many effects are active. On a 16GB RAM machine editing 1080p H.264 footage with proxy mode off, crashes commonly start around 50–70 clips. With proxy mode on, that ceiling typically rises past 150.
Why does CapCut crash when I add clips but not during playback?
Adding a clip triggers CapCut to load asset metadata, generate a thumbnail, and register the clip in the project index — all simultaneously. If your RAM is already near capacity from existing clips, this brief spike pushes it over the edge. It’s the same memory pressure problem, just triggered by an import event rather than a playback event.
Does closing other apps before opening CapCut actually help?
Yes, meaningfully. Chrome with 20 tabs, Discord, Spotify, and a browser-based tool can consume 4–6GB of RAM before CapCut opens. Closing background applications gives CapCut more headroom before it hits the crash threshold. On systems with 16GB RAM or less, this is a practical first step.
Will adding more RAM fix CapCut crashing on large timelines?
It helps, but it’s not a complete fix. Going from 16GB to 32GB raises the ceiling, but CapCut’s memory architecture means it will eventually hit the new ceiling too on large enough projects. Proxy mode and project splitting address the root cause; RAM expansion extends the range at which the symptoms appear.