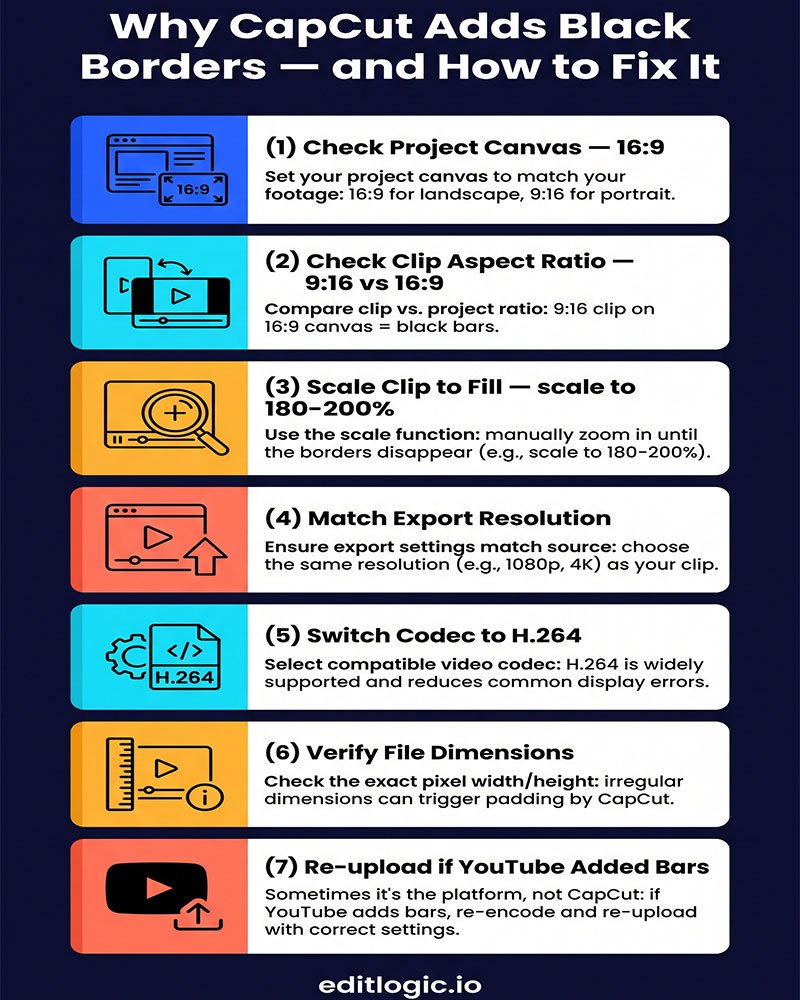
Black borders appear when your export resolution or aspect ratio doesn’t match your timeline settings. CapCut fills the gap with black bars — top and bottom for letterboxing, left and right for pillarboxing — rather than cropping or stretching your footage. The fix is almost always a mismatch between your project settings, your clip aspect ratio, or your export configuration.
Why It Happens
CapCut’s timeline has a fixed canvas size set when you create the project. If you import footage recorded at a different aspect ratio — a 9:16 vertical clip on a 16:9 timeline, or 4:3 archive footage on a 16:9 canvas — CapCut places the clip inside the canvas without automatically scaling it up. The empty space around it renders black. The same problem occurs at export when your output resolution doesn’t match your timeline canvas: CapCut pads the difference rather than resampling the frame.
YouTube expects 16:9 footage at standard resolutions (1080p, 1440p, 4K). Any deviation — even a small one — triggers YouTube’s own padding algorithm on top of whatever CapCut has already done, which compounds the problem.
How to Fix It
Work through these steps in order. Each one addresses a different root cause. Stop when the black borders are gone.
Step 1 — Confirm your project canvas matches 16:9
Go to the project dashboard, click the three-dot menu on the affected project, and select Edit. Look at the Resolution setting. It should be 1920×1080, 2560×1440, or 3840×2160 — all 16:9. If it shows anything else (1080×1920, 1080×1080, or a custom size) your canvas is wrong for YouTube. You cannot change canvas size on an existing project in CapCut Desktop — you will need to create a new project at the correct resolution and rebuild your timeline.
Step 2 — Check each clip’s original aspect ratio
Select a clip on the timeline and look at the properties panel on the right. Note the original resolution shown under the clip info. If the clip is vertical (9:16) or square (1:1) but your canvas is 16:9, CapCut is letterboxing or pillarboxing it by default. This is working as intended — but the fix is scaling the clip, not changing the canvas.
Step 3 — Scale the clip to fill the canvas
With the clip selected, go to the Basic tab in the properties panel. Increase the Scale slider until the clip fills the frame completely. For a 9:16 clip on a 16:9 canvas you will need to scale to roughly 180–200% to eliminate the side bars — which will crop the top and bottom of the original clip. This is intentional: you are trading field of view for a clean 16:9 frame. Alternatively use the Fit dropdown in the preview window and select Fill instead of Fit.
Step 4 — Check for inadvertent canvas padding in the export settings
Open the Export panel. Under Resolution, confirm the output matches your project canvas. If your project is 1920×1080 and your export is also set to 1920×1080, this is correct. If there is a mismatch — for example the project is set to a non-standard size and the export is rounding to the nearest standard resolution — CapCut will pad the output. Set both to the same standard 16:9 value.
Step 5 — Check your codec and bitrate settings
This is less common but worth checking. Some codec configurations in older CapCut Desktop versions have introduced a rendering artefact that adds a 1–2 pixel black border around the frame. Switch your codec from HEVC to H.264 and re-export a short test clip. for converting footage before import if their source files are the root cause of the codec issue. Convert your footage using Handbrake first. If the border disappears, the codec was the issue. H.264 is also the more stable choice for YouTube uploads generally — the same reasoning applies to the color space issues covered in the CapCut color space and gamma fix guide.
Step 6 — Verify the final export file before uploading
Before uploading to YouTube, open the exported file in VLC or Windows Media Player and check the actual frame dimensions. Right-click the file → Properties → Details (Windows) or Get Info → More Info (Mac). The pixel dimensions should read exactly 1920×1080, 2560×1440, or 3840×2160. If they don’t — if they show something like 1916×1080 or 1920×1076 — the issue is in your CapCut export settings and needs to be corrected before upload.
Step 7 — Re-upload with the correct file if YouTube added its own borders
YouTube adds its own black bars if the uploaded file is not a standard 16:9 resolution. If your CapCut export file checks out at correct dimensions in step 6 but YouTube is still showing borders in the player, this is a YouTube processing delay — the platform re-encodes uploaded videos and sometimes shows the uncorrected version for up to 30 minutes. Check again after the upload fully processes. If the borders persist after processing, your file dimensions are not actually 16:9 and you need to repeat steps 4–6.
FAQ
Why does my CapCut video look fine in the preview but have black bars after export?
The preview window scales your canvas to fit the preview panel regardless of canvas dimensions, which can hide black bars. The export renders the actual canvas size including any empty space. Always check the exported file rather than the preview.
My footage is 16:9 but CapCut is still adding black borders — why?
The most common cause is that your clip looks 16:9 but was recorded with different encoded dimensions — some cameras add letterboxing internally before writing the file. Open the clip’s properties in CapCut and check the actual pixel dimensions, not just the display size. If it shows 1440×1080 or similar, the clip itself is not true 16:9.
Will scaling a vertical clip to fill a 16:9 canvas reduce quality?
Yes, scaling up crops the original frame and enlarges the remaining pixels, which reduces sharpness. For the best result, shoot in 16:9 if YouTube is the primary destination. If you’re working with vertical footage, accept the crop or build a split-screen layout that uses the vertical framing intentionally rather than scaling it to fill.
Does this also cause the washed-out color problem after export?
No — black borders and washed-out colors are separate issues with different causes. The color problem is a codec and color space mismatch covered in its own guide. They can appear together if your export settings are misconfigured across multiple parameters, but fixing the aspect ratio does not fix the color and vice versa.