CapCut exports look washed out for one of four reasons: the bitrate is too low and color data is being discarded, the codec is introducing gamma shift on playback, the project is set to HDR but the export container is SDR, or the color space isn’t aligned to what the delivery platform expects. The fix depends on which one applies to your project.
Why It Happens
CapCut’s preview engine renders color in real time using your display’s native profile. What you see in the timeline is not a committed output — it’s a live approximation. When you export, CapCut has to flatten everything into a single video stream, and three things can go wrong at that stage.
Bitrate too low. CapCut’s default “Recommended” bitrate compresses aggressively to keep file sizes small. That compression discards color data in the shadows and midtones — the areas with the least contrast and the most susceptibility to banding. If your grade has subtle color work, low bitrate destroys it.
Codec and container mismatch. HEVC (H.265) handles video compression efficiently but its gamma handling differs from H.264 in how it tags the output file’s color metadata. On Mac specifically, MOV containers processed through QuickTime apply an additional gamma correction that lifts the blacks and desaturates the image. This is the classic “Mac gamma shift” and it only appears on export, not in preview.
HDR to SDR mismatch. If your CapCut project has HDR or Smart HDR enabled but you’re exporting to a standard MP4 for YouTube or Instagram, the platform receives HDR metadata it doesn’t know what to do with. The result is a tone-mapped output that looks flat, blown out in the highlights, and muddy in the shadows.
Color space misalignment. YouTube, Instagram, and most platforms expect video in Rec.709. If your project is set to a different color space, or if your footage was shot in a log profile that wasn’t converted before export, the platform’s re-encoder interprets the data incorrectly and the colors shift.
How to Fix It
Work through these steps in order. Each addresses a specific cause.
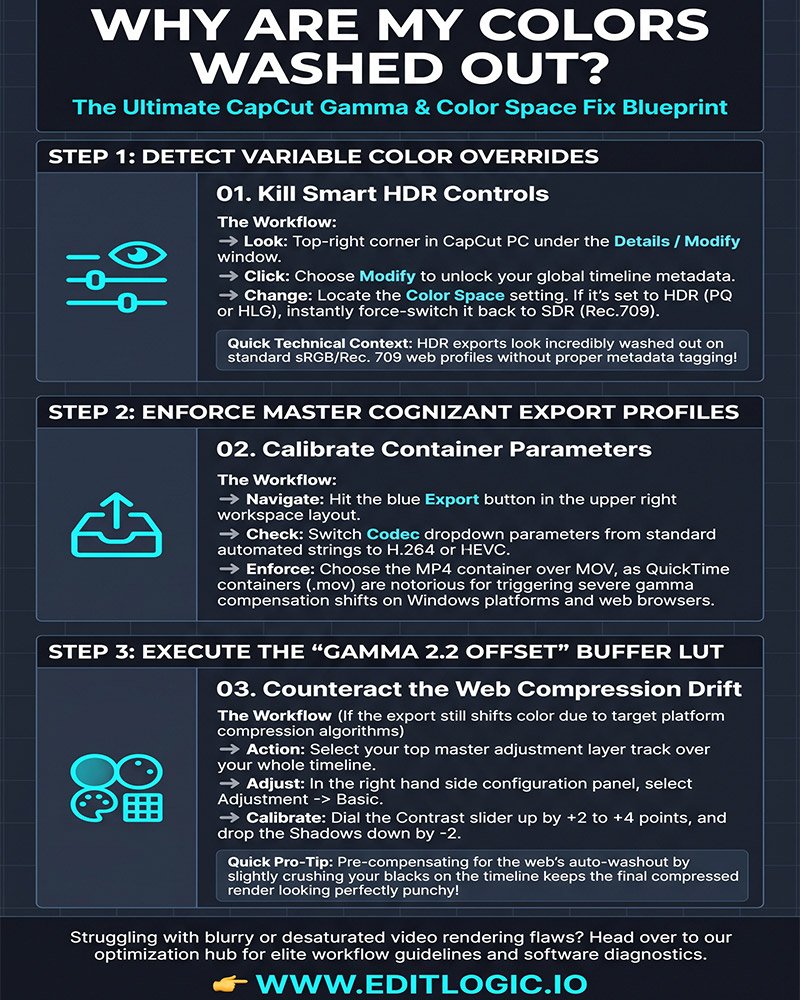
Step 1 — Raise your export bitrate
In the Export panel, change Bitrate from Recommended to Custom. Select VBR (Variable Bit Rate) and move the slider to Higher. For 1080p, target 30,000 to 45,000 Kbps. For 4K, target 80,000 to 100,000 Kbps.
This is the most common cause of washed-out exports from CapCut and the fastest fix. If your colors look correct after raising the bitrate, you don’t need to continue.
Step 2 — Switch to H.264 in an MP4 container
Change your export codec from HEVC to H.264 and make sure the container is MP4, not MOV. H.264 has more consistent gamma tagging across platforms and players. On Mac, MOV triggers QuickTime’s gamma compensation, which lifts blacks and reduces apparent saturation. Switching to H.264 MP4 eliminates this entirely.
For YouTube exports specifically, H.264 at a high bitrate handles the platform’s re-compression better than HEVC and produces more predictable color output.
Step 3 — Disable Smart HDR and force SDR Rec.709
Go to your project settings and turn off any HDR or Smart HDR option. Set your color space to SDR and confirm the profile is Rec.709. This is the delivery standard for YouTube, Instagram, TikTok, and virtually every other social platform.
If your footage was shot in a log profile (S-Log, V-Log, etc.), you need to apply a LUT or manual correction to convert it to Rec.709 before export. Exporting log footage without conversion is what produces the flat, desaturated look that looks correct in some players but washed out everywhere else.
Step 4 — Enable hardware GPU acceleration
Go to Settings → Performance and enable both Hardware Encoding and Hardware Decoding. Color grading and HDR processing are GPU-intensive. Without hardware acceleration, the CPU handles the export alone and can drop color data or stall — particularly on projects with multiple adjustment layers, LUTs, or effects stacked on the same clip.
This step also prevents the export freezing at 99% that often accompanies heavy color grades on mid-range machines.
FAQ
Why does my video look washed out after exporting from CapCut?
CapCut’s preview renders color in real time using your display profile. Export flattens everything into a fixed stream, and that’s where bitrate compression, codec gamma tagging, and HDR metadata mismatches all surface. The preview looking fine doesn’t rule out any of these export-level issues.
How do I fix the color shift on Mac and iPhone?
Switch your container from MOV to MP4 and change the codec to H.264. QuickTime applies gamma correction to MOV files that lifts blacks and reduces saturation — it only shows up on export, not in preview. H.264 MP4 bypasses this entirely.
What settings should I change to prevent faded colors?
Change Bitrate to Custom VBR set to Higher, switch codec to H.264 MP4, and disable Smart HDR in project settings. Set your color space to SDR Rec.709. These four changes cover the most common causes in order of frequency.
Can I compensate for the washout during the editing process?
You can slightly compensate by boosting contrast and crushing shadows before export, but it’s treating the symptom rather than the cause. The correct fix is raising your bitrate and confirming your color space — those changes eliminate the washout at the source rather than trying to pre-correct for it.
Which bitrate setting is best for maintaining color depth?
Custom VBR set to Higher. Target 30,000 to 45,000 Kbps for 1080p and 80,000 to 100,000 Kbps for 4K. The Recommended preset compresses too aggressively and discards color data in the shadows and midtones where subtle grading lives.