A freeze at 99% is a specific problem with a specific cause. CapCut has finished rendering your footage but is stalling on the final step — stitching the visual frames together with the audio track and writing the file container metadata. The render isn’t lost; it’s stuck at the handoff.
This guide covers why it happens and how to get the export to complete.

Step 1: Force-Flush Clogged Pre-Render Cache
The more you slice, add smart auto-captions or add intricate transition keyframes, the more temporary pre-render files pile up behind your screen on CapCut Desktop. These hidden directories become very cluttered, and, during the last stages of the export engine’s assembly, an artificial bottleneck occurs. This removes the data from the pipeline, without risking your master project file.
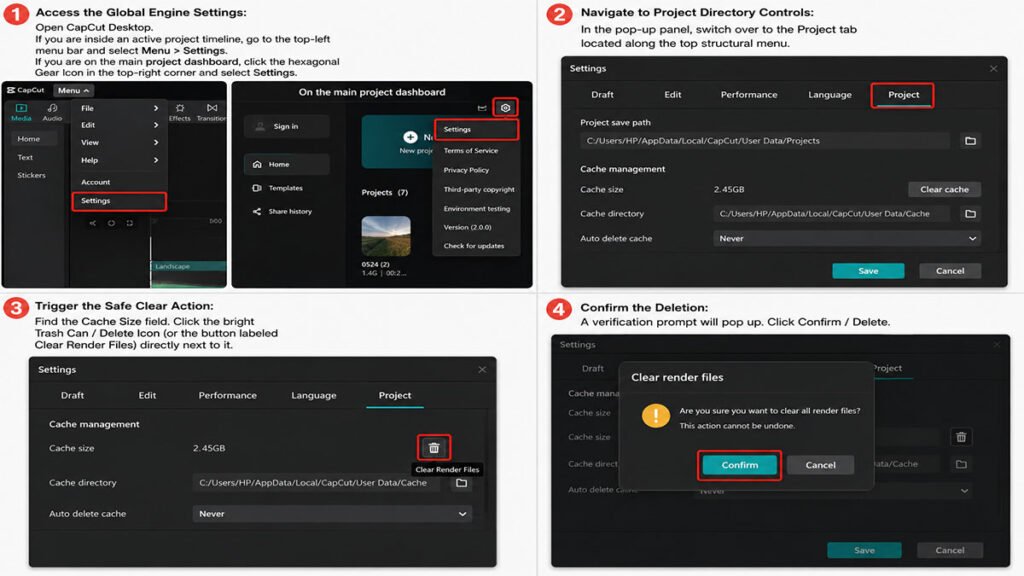
- Access the Global Engine Settings: Open CapCut Desktop. If you are inside an active project timeline, go to the top-left menu bar and select Menu > Settings. If you are on the main project dashboard, click the hexagonal Gear Icon in the top-right corner and select Settings.
- Navigate to Project Directory Controls: In the pop-up panel, switch over to the Project tab located along the top structural menu.
- Trigger the Safe Clear Action: Find the Cache Size field. Click the bright Trash Can / Delete Icon (or the button labeled Clear Render Files) directly next to it.
- Confirm the Deletion: A verification prompt will pop up. Click Confirm / Delete.
💡 Zane’s Pro Tip: Rest assured that executing this safe flush only destroys temporary layout waveform data and pre-rendered preview files. Your actual cuts, timeline markers, effects layouts, and imported source clips are 100% safe and untouched.
Step 2: Toggle VRAM Overlap & Hardware Acceleration
To get the best performance for fast rendering, the hardware GPU acceleration is essential, but if your graphic drivers are unable to read the codecs in your sequence or unable to synchronize the sequence across threads at the end of your timeline, the GPU will lose the processing thread, leaving you with 99% of your timeline stuck. The hardware engine is re-initialised to ensure that the software is able to allocate system resources cleanly.
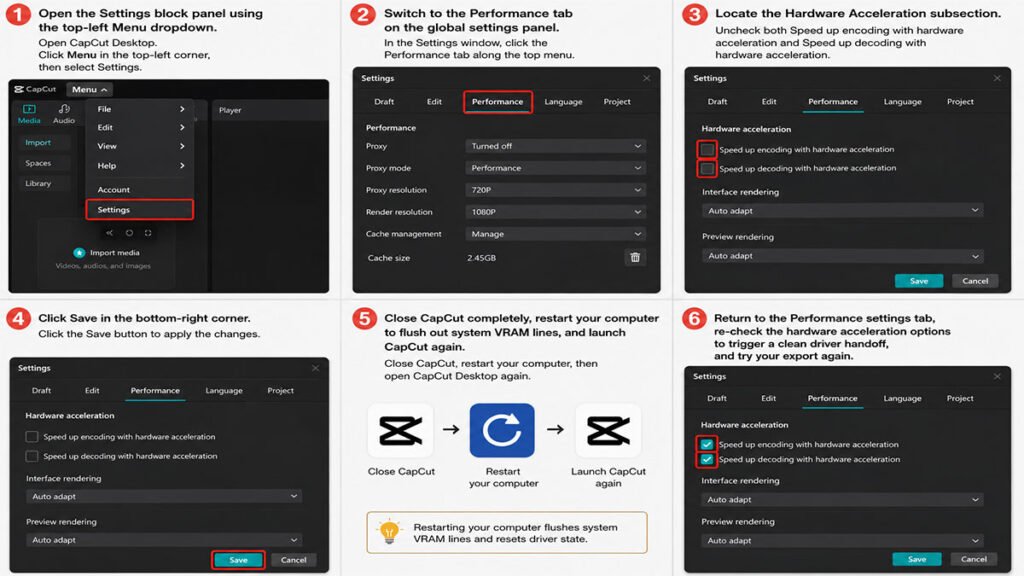
- Re-open the Settings block panel using the top-left Menu dropdown.
- Switch to the Performance tab on the global settings panel.
- Locate the Hardware Acceleration subsection.
- Uncheck both Speed up encoding with hardware acceleration and Speed up decoding with hardware acceleration.
- Click Save in the bottom-right corner.
- Close CapCut completely, restart your computer to flush out system VRAM lines, and launch CapCut again.
- Return to the Performance settings tab, re-check the hardware acceleration options to trigger a clean driver handoff, and try your export again.
Step 3: Check for the “Corrupted Frame” Audio-Video Gap
The 99% mark is where CapCut stops aligning the separate video tracks and master audio track, so if there is any rogue video frame, broken audio transition, or variable framerate (VFR) video clip at the very end of your timeline, it will mess up the export handler.
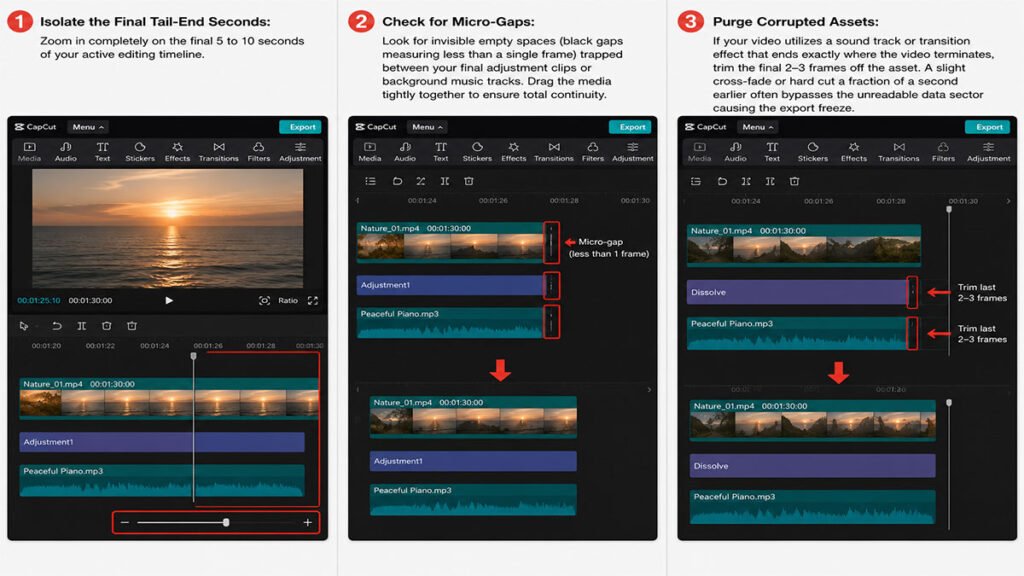
- Isolate the Final Tail-End Seconds: Zoom in completely on the final 5 to 10 seconds of your active editing timeline.
- Check for Micro-Gaps: Look for invisible empty spaces (black gaps measuring less than a single frame) trapped between your final adjustment clips or background music tracks. Drag the media tightly together to ensure total continuity.
- Purge Corrupted Assets: If your video utilizes a sound track or transition effect that ends exactly where the video terminates, trim the final 2–3 frames off the asset. A slight cross-fade or hard cut a fraction of a second earlier often bypasses the unreadable data sector causing the export freeze.
Step 4: Verify Disk Space Allocation & Output Path Permissions
By default, when you export to a standard 1080p or 4K file, it does not write directly to the target file in one pass. CapCut generates a temporary container file but it is invisible during rendering. The software will choke at 99% if the targeted drive has limited free space, as it is unable to write to the scratch folder while at the same time writing to the finalized video container.
- Calculate Safe Over-Provisioning: Check your local hard drive allocation. Always ensure you have at least double the estimated file size of your video available as free space before hitting export.
- Modify the Output Destination: In the final Export Pop-Up panel, look at the Export to path field.
- Click the folder icon, change your rendering destination away from heavily restricted system directories (like deep AppData or root C: system drives), and set it to a dedicated, high-speed folder on your desktop or an external SSD. This bypasses structural administrative blockages instantly.
Export Bottleneck & Performance Matrix
| System Culprit | Immediate Timeline Vibe | Underlying Technical Bottleneck | Recommended Diagnostic Action |
|---|---|---|---|
| Clogged Engine Cache | Stuttering playback, timeline preview lag. | Fragmented pre-render blocks and broken preview waveforms choking RAM allocations. | Run a global Project Cache flush and establish an auto-clean ceiling. |
| GPU Driver Fault | High system heat, infinite spinning wheel at 99%. | VRAM allocation overload or mismatched multi-thread GPU handoff failure. | Cycle Hardware Encoding options off, reboot system, and re-enable acceleration. |
| Corrupted Media Tail | Instant stall on the last single frame of video rendering. | Variable Framerate (VFR) conflicts or unreadable audio container codecs at timeline end. | Trim the final 3 frames of audio/video and delete overlapping ending transitions. |
| Storage Cap Failure | Output drive mysteriously fills up right before the app hangs. | Insufficient disk space allocation preventing the final assembly pass. | Remap output destination path directly to a clear, administrative-approved SSD folder. |