Most editors use CapCut for the basics — trimming clips, dropping in a transition, adding music. It’s quick and it works. But the app has a deeper layer that most people never touch: export settings that survive platform compression, AI voiceover tools that don’t sound robotic, and performance settings that keep a 4K timeline running smoothly on mid-range hardware.
This guide covers the settings and workflows worth knowing.
1. Advanced Custom VBR Bitrate Tuning (Bypass Social Media Compression)
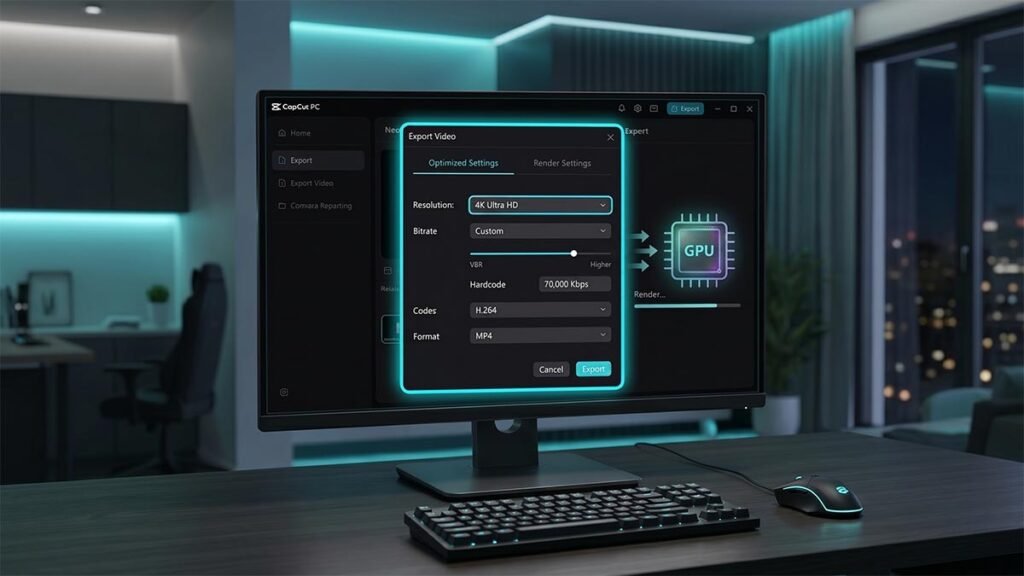
Ever take hours to make a video, only to see it come out blurry or pixelated when it’s uploaded to YouTube Shorts, TikTok, Instagram Reels? CapCut’s automatic settings by default focus on small file sizes and quick processing time. The software gets rid of the small information from your video timeline, ensuring that your hard drive remains light. The key to preserving your video from affecting the ‘Recommended’ export mode is to avoid that option and use a blueprint that specifies the Custom Variable Bit Rate (VBR).
How to Unlock True 4K Quality:
- Navigate to the top-right corner and click the blue Export button.
- Under the Video exporting settings, locate Bitrate.
- Change it from Recommended to Custom.
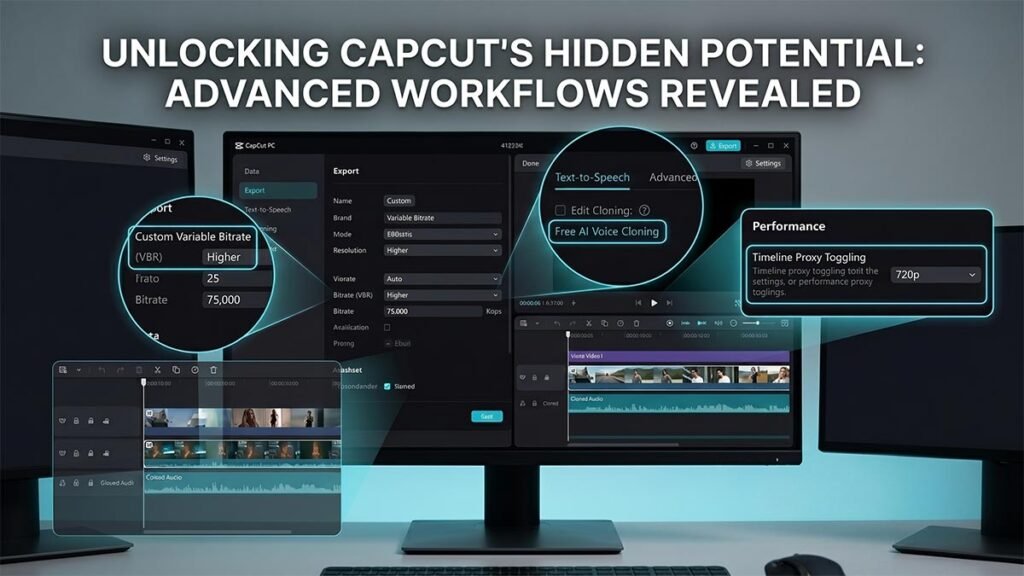
- Switch the dropdown menu from CBR (Constant Bitrate) to VBR (Variable Bit Rate) and choose Higher.
- Manually push your bitrate ceiling higher (up to 70,000 Kbps for high-motion 4K footage).
This is because you are providing the platform’s compression algorithm with an ultimate master blueprint by providing it with a higher data density via an H.264 or HEVC codec container. Your final timeline assets will still be very crisp, even after the compression process your file has undergone.
2. Free AI Voice Cloning and Advanced Text-to-Speech
While it’s easy to create realistic voiceovers, you might not have a fancy microphone, acoustic treating, or a pricey voice subscription service to rely on. Creating realistic voiceovers is easy, but if you don’t want to spend hundreds of dollars on a microphone or expensive third-party AI voice subscription services, there’s an incredibly powerful voiceover solution you’ll find right in CapCut.
With CapCut’s AI Text-to-Speech feature, typing a text script will instantly convert it into natural-sounding speech. The Voice Cloning feature, however, is the true secret sauce: Brand voice consistency across all your videos without putting your voice in a microphone.
Setting Up Automated Voice Workflows:
- Select the Text tool in the top left menu and drag a default text box onto your timeline.
- Type or paste your video script into the text module.
- With the text box selected, click the Text-to-Speech tab in the top-right properties panel.
- Browse through dozens of free AI voice profiles (categorized by styles, tones, and languages) or select the option to record a sample of your own voice to clone it.
- Click Start Reading. CapCut will automatically generate a separate, perfectly synced audio track directly underneath your video clips.
Once the audio track is built, you can safely turn off or delete the text overlay on your video timeline, leaving behind a clean, professional, studio-quality narration.
Deep beneath CapCut’s user-friendly interface lies a robust engine packed with hidden technical configurations and advanced automated utilities. While most creators only stick to basic timeline cutting, accessing the full suite of tools via the official CapCut AI video editing platform allows you to unlock hyper-realistic automated voiceovers and optimized proxy workflows.
3. The Pre-Render Cache Flush (The Instant Performance Fix)
If you use CapCut regularly, you’ve probably noticed that after a few weeks of heavy cutting, the software doesn’t feel quite as snappy as it used to. Your live timeline previews might start to stutter, frames begin to drop, and your hard drive space mysteriously vanishes.
The culprit? Cache build-up. Every time you import footage, generate smart auto-captions, or apply complex color grading, CapCut generates massive temporary pre-render files behind the scenes. If you don’t flush these out, they create an artificial performance bottleneck.
How to Safely Flush the Cache Without Deleting Projects:
- Open CapCut Desktop, but do not click into a project timeline. Stay on the main homepage dashboard.
- Click the Settings (gear icon) in the upper right-hand corner and choose Settings from the dropdown menu.
- Go to the Project tab.
- Look directly across from Cache Size, where you will see exactly how many gigabytes of hidden junk files are choking your system.
- Click the trash can or Delete/Clear button.
Don’t worry: Doing this inside CapCut’s official interface is completely safe. It will wipe away heavy, unneeded temporary render files but will never touch your original timelines, custom presets, or raw project media assets.
4. Timeline Proxy Toggling for Weak Computers
Trying to edit 10-bit color, high-frame-rate, or 4K camera footage on a standard laptop can bring your creative flow to a grinding halt. Instead of upgrading your hardware, you can use CapCut’s hidden Proxy workflow to easily eliminate lag.
When you turn on proxies, CapCut automatically creates lightweight, lower-resolution duplicate versions of your videos to use while you edit.
- The Editing Phase: You slice, crop, and arrange your footage using the fast, lightweight proxy files. Your computer plays back the timeline flawlessly without dropped frames.
- The Export Phase: The second you hit “Export,” CapCut automatically swaps the low-res proxies back out for your original, ultra-high-resolution master files.
To enable this feature, head back into your global application Settings, look under the Performance tab, and toggle on Proxy. Set the resolution preference to 720p or performance-optimized modes to instantly bypass hardware bottlenecks.
5. Bypassing Post-Export Freezes & 99% Render Errors
There is nothing more frustrating than spending hours editing, clicking export, watching the percentage bar climb steadily, and then… boom. It hits 99% and completely freezes, or the post-export popup menu gets stuck and locks you out of your workspace.
When CapCut stalls at the very end of a render, it rarely means your app has crashed completely. Instead, it indicates that CapCut has successfully rendered the visuals but is struggling with the final multiplexing phase—stitching your separate audio and video render tracks together and writing the final container metadata.
The Fast Diagnostic Checklist:
- Check Your Audio Format: If you imported a strange, variable-bitrate audio track or a low-quality web conversion into your edit, it can break the multiplexing phase. Highlight your audio files in the timeline, look at the top-right properties panel, and try using CapCut’s built-in audio features to normalize or convert them.
- Toggle Hardware Acceleration: Under your app’s global Performance settings, make sure Hardware Encoding is enabled. This forces the software to leverage your system’s dedicated GPU chipset rather than exhausting your CPU.
- The Safe Force-Close: If the final “Exported Successfully” popup freezes on your screen and blocks your timeline, don’t panic. Because CapCut auto-saves your edit with every single cut you make, your timeline is safe. You can safely open your computer’s system layer (Task Manager on Windows via
Ctrl + Shift + Escor Force Quit on Mac viaCmd + Option + Esc) to terminate the application and restart it without losing a single frame of your hard work.
Conclusion: Master Your Video Timeline
CapCut Desktop is far more than a simple, entry-level smartphone app ported over to the computer. By unlocking advanced VBR custom bitrates, utilizing built-in AI text-to-speech voice engines, maintaining a clean pre-render cache, and leveraging proxies, you take complete control over your video workflow.
Stop letting default settings dictate your content’s visual fidelity and editing speed. Dive into your settings menu today, unlock CapCut’s hidden potential, and start producing pristine, lag-free, professional-grade videos!