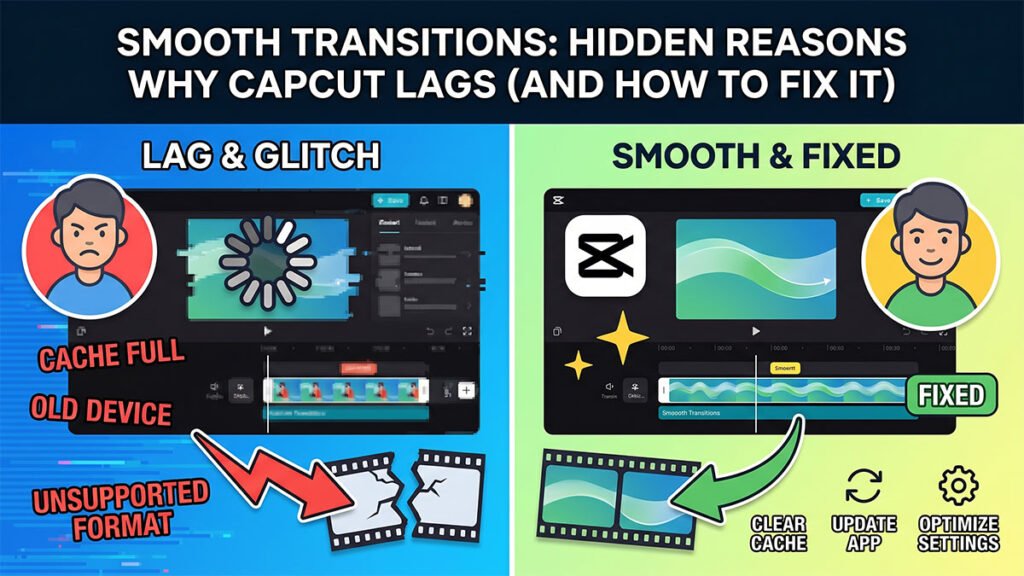
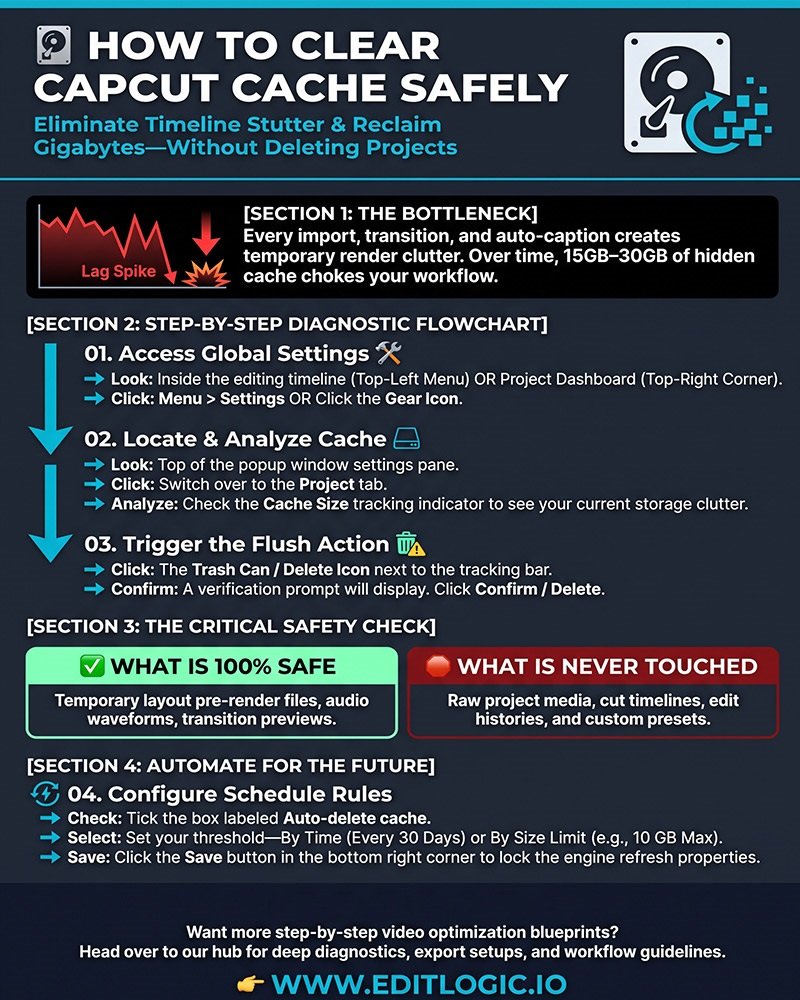
After a few weeks of regular use, CapCut starts accumulating render cache — temporary files generated every time you import footage, run auto-captions, or apply a transition. They’re useful while you’re working but serve no purpose after the fact, and they add up fast.
Clearing them is safe and takes about a minute. This guide shows you how to do it without touching your timelines, presets, or project assets.
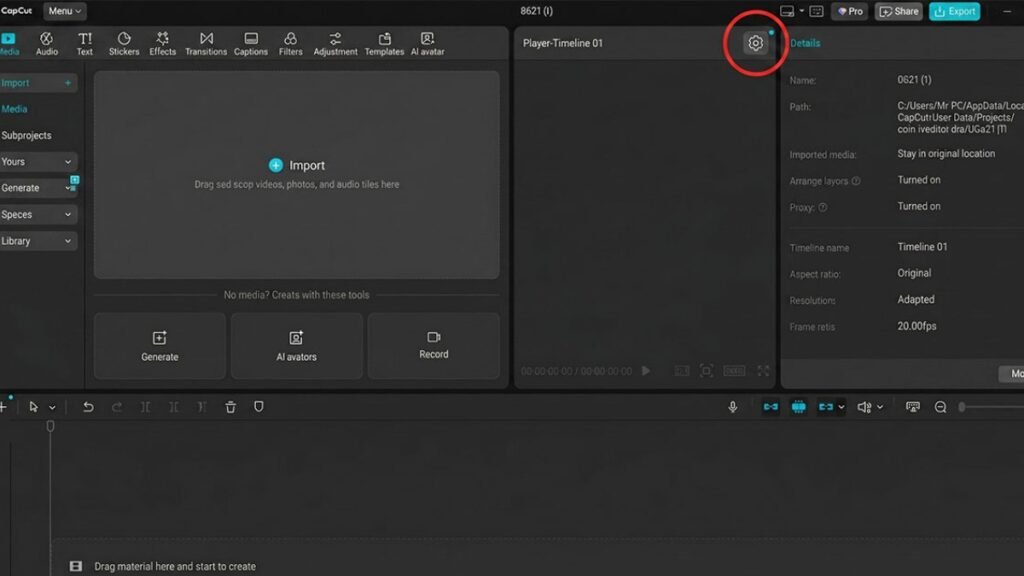
Step 1: Access the Global Project Settings
CapCut’s file management is hidden by default in the main settings of the app. If you have to do it manually, you don’t want to locate the Windows or Mac app data folders and then get your fingers on the critical project media inside the software interface.
- Launch CapCut Desktop on your computer.
- If you are inside an active editing timeline, navigate to the top-left main menu and click on Menu > Settings.
- If you are on the initial project selection dashboard, simply look for the Gear Icon in the top-right corner and select Settings.
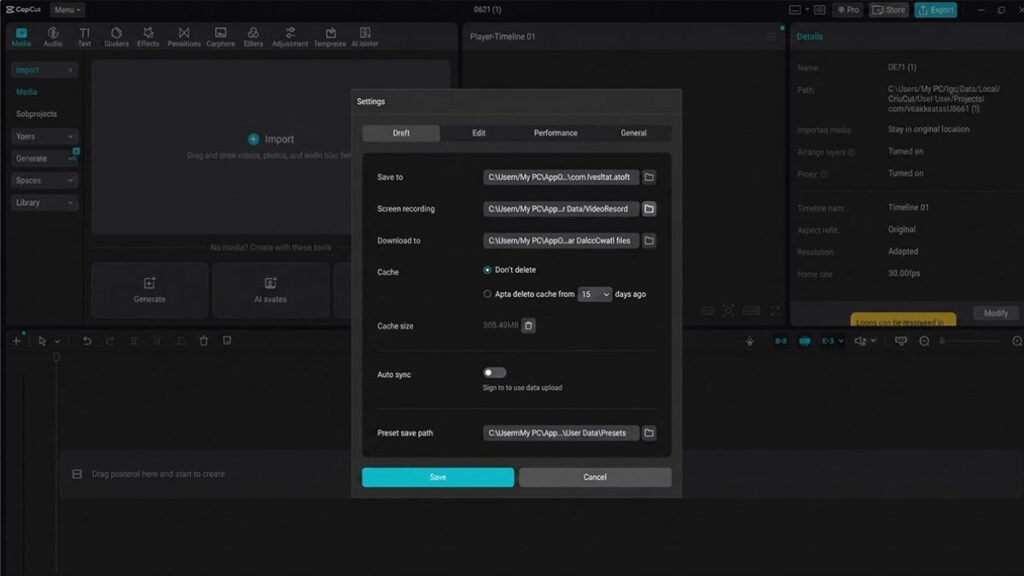
Step 2: Locate and Analyze Your Cache Size
After the setting pop-up box is displayed on your screen, you should move on to the structural layout options where CapCut is running its background tasks.
- Switch over to the Project tab located at the top of the settings window.
- Look closely at the middle section of this screen for the Cache Size indicator.
- Here, you will see exactly how many gigabytes of data CapCut is currently holding hostage on your storage drive. For active creators, this number can frequently exceed 15 GB to 30 GB of hidden clutter!
Step 3: Trigger the Cache Flush Action
Once you’ve located the bottle neck, it’s time to execute the safe deletion sequence.
- Directly next to the cache size data tracking bar, you will see a bright Trash Can / Delete Icon (or a button labeled Clear Render Files). Click it.
- A secondary verification warning prompt will pop up on your screen asking you to confirm the action.
- Click Confirm / Delete.
Important Safety Check: What Actually Gets Deleted?
* WHAT IS SAFE: This action only erases temporary layout pre-render files, media waveforms, and transition preview clips. * WHAT IS NOT DELETED: Your actual video projects, cut history, timeline layouts, and imported media clips are 100% safe. CapCut will simply recreate these preview cache files automatically the next time you open a project.
Step 4: Configure Auto-Deletion for Future Edits
To make sure you never have to deal with manual timeline performance degradation again, you should let CapCut handle the cleanup automatically on a strict schedule.
Right below the manual delete button, you’ll see the auto-clean configuration controls. Check the box for Auto-delete cache and choose your preferred rule:
- By Time: Set it to delete cache automatically every 30 days.
- By Size limit: Set a cap (like 10 GB) so that CapCut sweeps the room before things bottleneck your hard drive.
Click Save in the bottom right corner to lock in your settings and refresh the engine.
Maintenance Impact Summary
| Cache State | Timeline Playback Performance | Hard Drive Space Status | System Bottleneck Risk |
|---|---|---|---|
| Clogged Cache | Laggy, stuttering previews, dropped frames | Heavily reduced (15GB+ lost) | High (CPU throttling) |
| Cleaned Cache | Silky smooth layout scrolling, stable timeline | Completely restored | Low (Optimized workflow) |
CapCut cache — common questions
Is it safe to delete CapCut cache?
Yes. CapCut’s cache contains only temporary render files generated during editing — preview renders, proxy files, and transition pre-renders. None of these are part of your actual project. Deleting them does not affect your timeline, imported media, or exported videos. CapCut rebuilds the cache automatically the next time you open a project.
Why shouldn’t I just leave the cache alone?
The cache itself isn’t harmful, but it takes up real drive space and can contribute to timeline lag as it grows. The main reason to clear it regularly is performance — particularly on laptops with limited SSD space, where a 10–15GB cache can cause meaningful slowdowns across the whole system, not just in CapCut.
Will clearing the cache delete my videos or projects?
No. The cache and your project files are stored separately. Clearing the cache removes only the temporary render data — your timelines, imported clips, custom presets, and exported videos remain completely untouched. This is the purpose of the separate trash icon in Settings → Project rather than a general delete function.
What happens if CapCut’s cache gets full?
A full cache causes timeline lag, stuttering during playback, and in some cases export slowdowns. CapCut doesn’t automatically cap or rotate its cache — it accumulates indefinitely until you clear it manually or set an auto-delete limit. Once the drive space the cache occupies becomes significant (typically 5GB+), performance degradation becomes noticeable on mid-range machines.
How do I check how much cache CapCut is using?
Go to Menu → Settings → Project tab. The Cache Size indicator shows the current total in gigabytes. Check this periodically — particularly after finishing a large project or after using AI effects extensively, both of which generate large cache volumes.
Why shouldn’t I just leave the cache alone?
The cache itself isn’t harmful, but it takes up real drive space and can contribute to timeline lag as it grows. The main reason to clear it regularly is performance — particularly on laptops with limited SSD space, where a 10–15GB cache can cause meaningful slowdowns across the whole system, not just in CapCut.
Does deleting CapCut delete my data?
Uninstalling CapCut Desktop completely removes the app and its associated cache and temp files. However, your project files are stored in a separate location (typically Documents/CapCut/User Data on Windows). These survive an uninstall unless you manually delete them. Clearing cache through Settings is not the same as uninstalling — it only removes the temp files, nothing else.